Support & FAQ
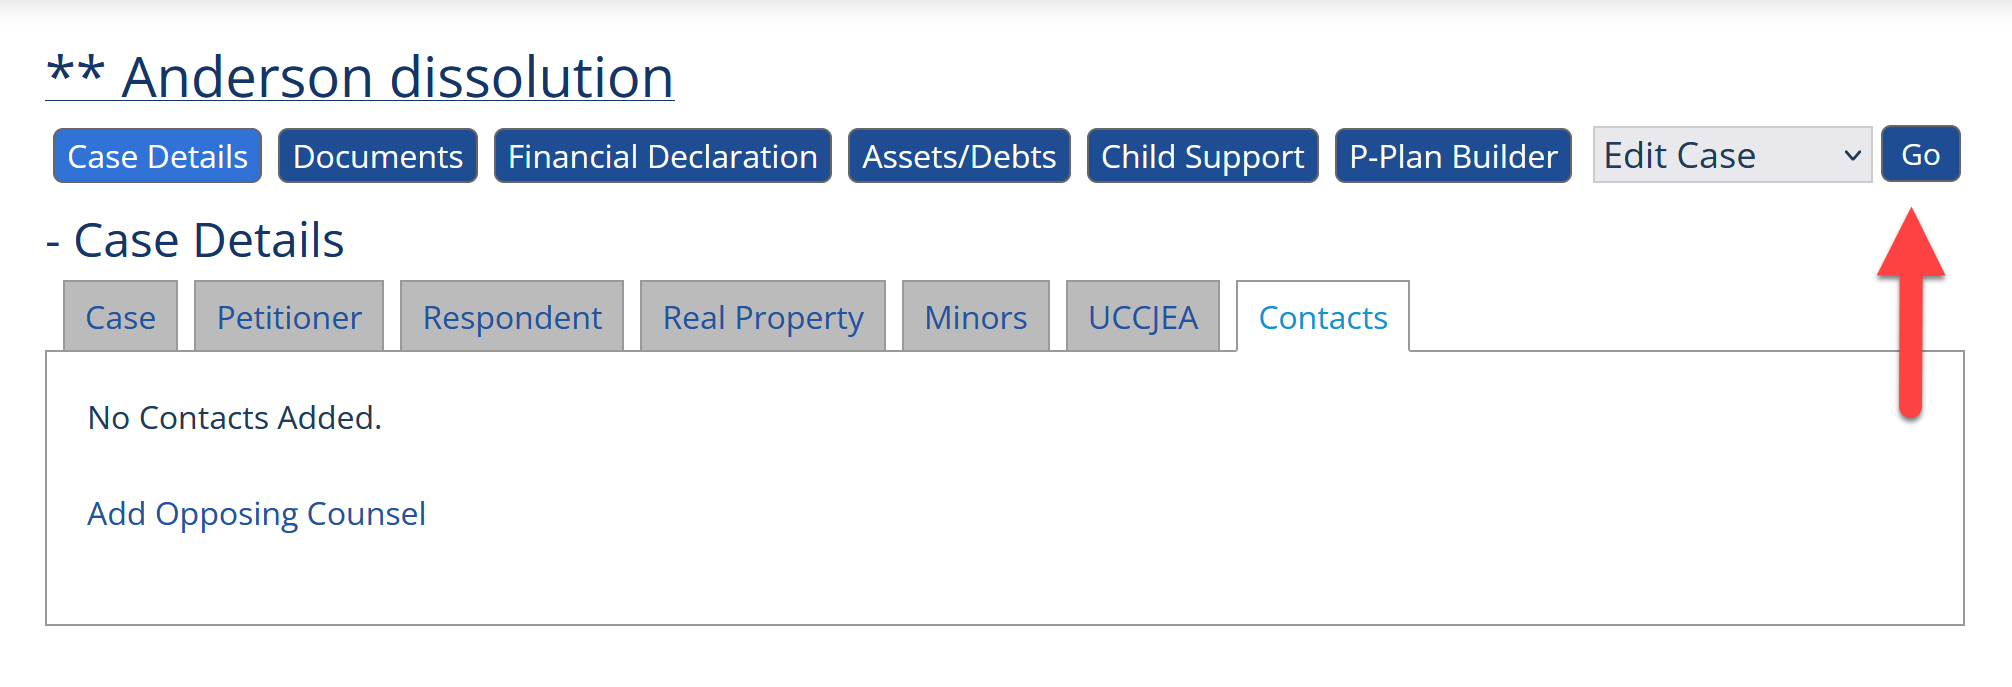
Washington Specific QuestionsYou can add a Guardian ad Litem - or any other non-party contact - to your case by selecting the 'Contacts' tab and clicking the 'Go' button while 'Edit Case' is selected on the dropdown menu:
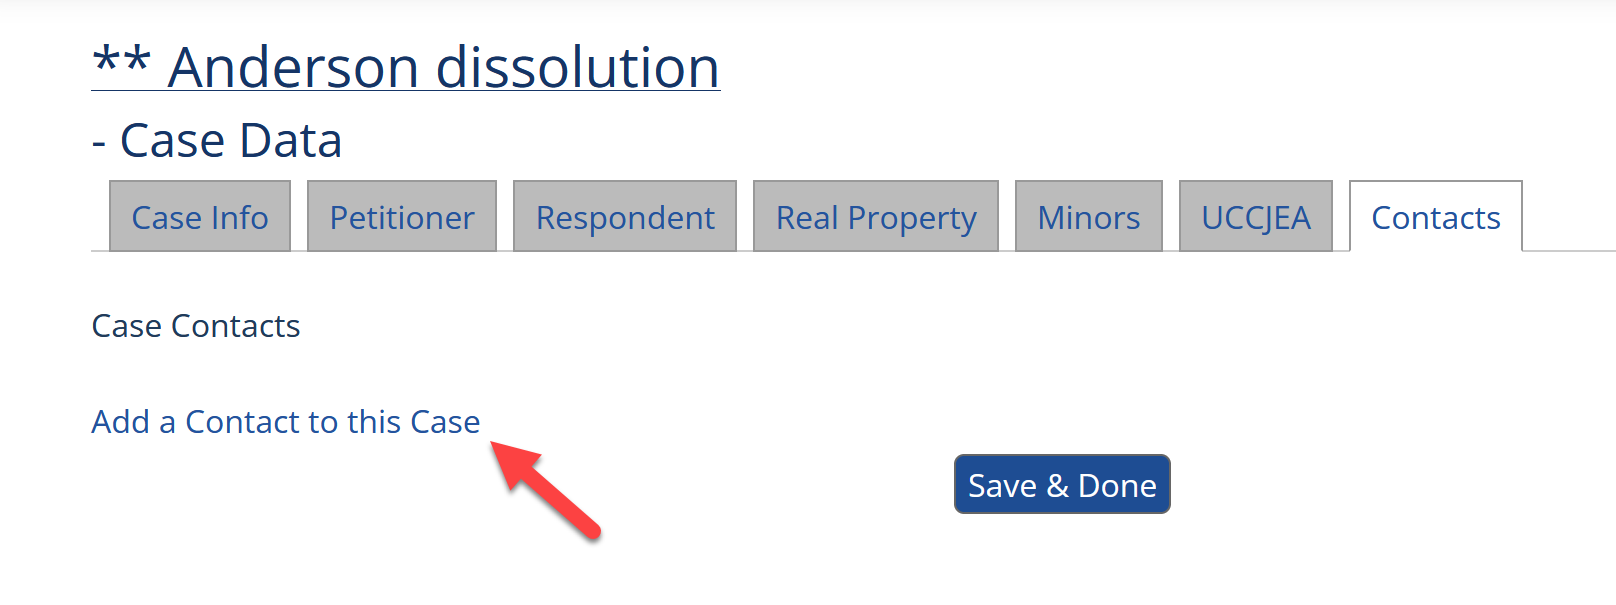
Next, click "Add a Contact to this Case'.
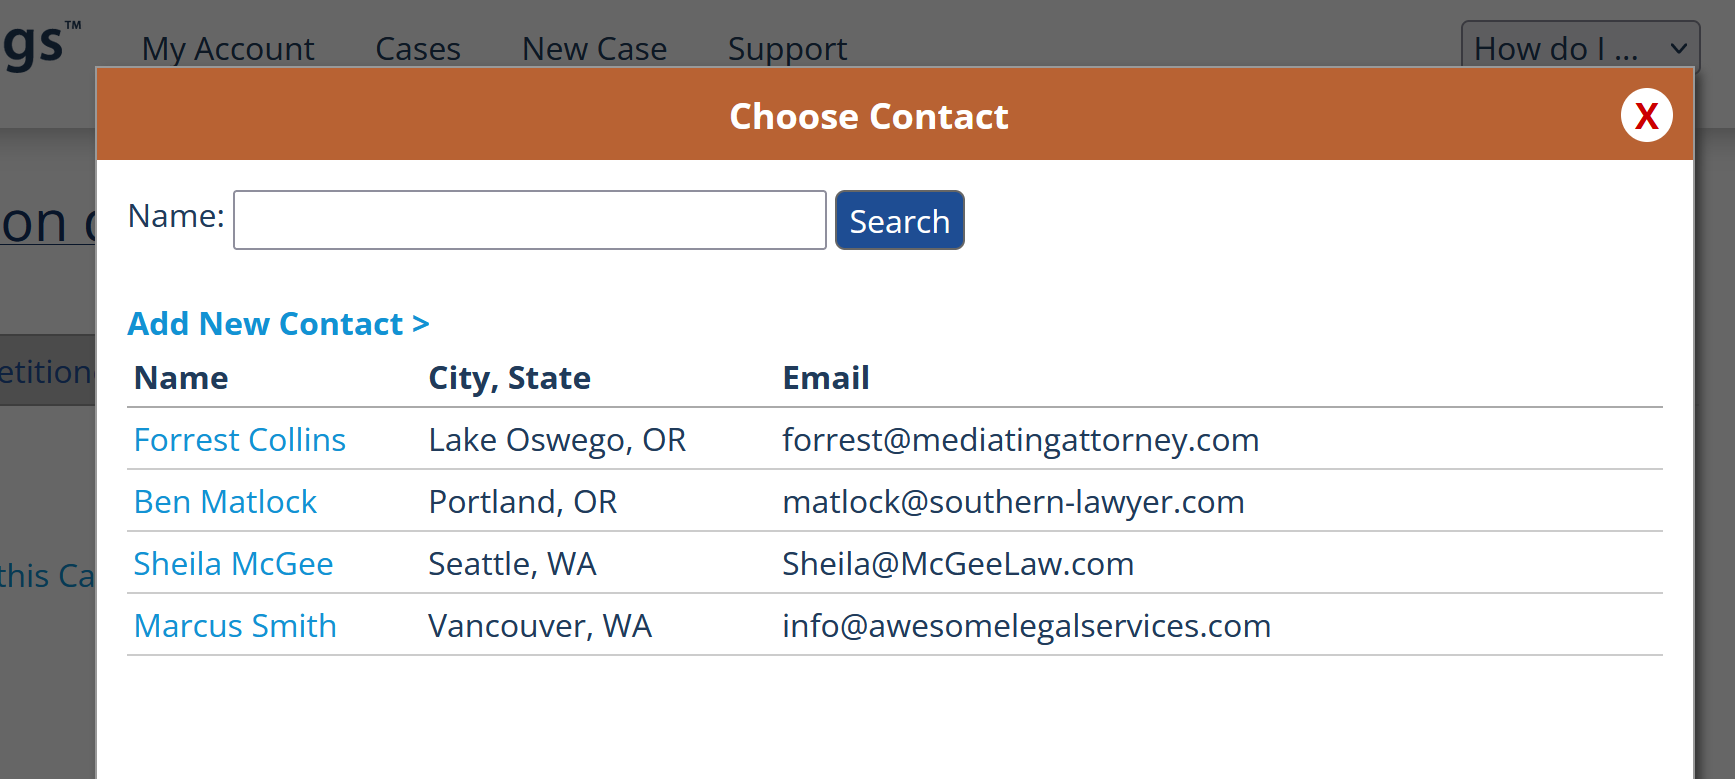
To select a contact to add to a case, click their name. If you need to add a new Contact to your account, click the "Add New Contact" link. Once you have added a contact once, you can add them to other cases in the future without having to re-enter their information.
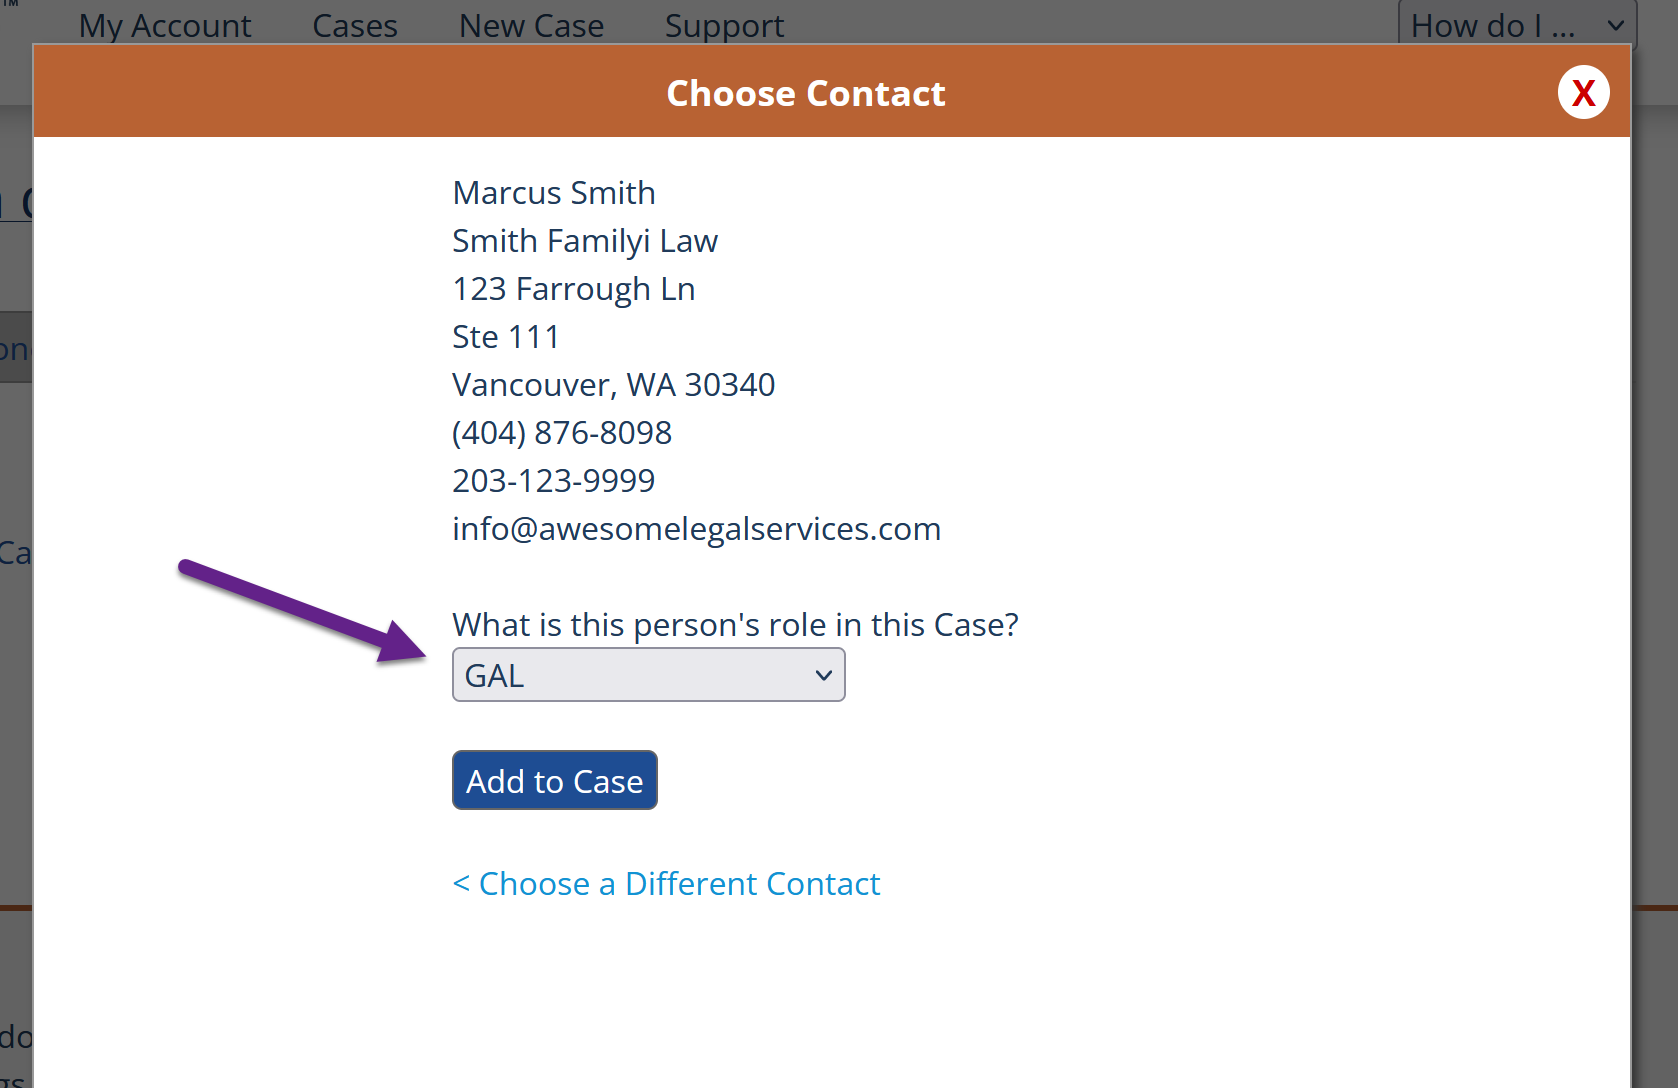
To set a contact as a Guardian ad Litem on a case, simply select "GAL" from the Role menu. Press the "Add to Case" button and then click "Save & Done". To add a different type of contact, select a different role from the 'Role' menu.
Note for Minor Guardianship cases: these cases use "People" rather than "Contacts". For instructions on setting up People for a Minor Guardianship case, see this FAQ: How do I add a Guardian ad Litem (or other contact) to a case?
Absolutely! We constantly monitor the state’s mandatory Family Law forms. We notify our users as soon as we see that updates have been made and then get to updating the forms.
No! MyPleadings is completely online. This means that you don’t have to download any software or software updates and that you can work on any computer anywhere. Once you draft a document, the document downloads fron MyPleadings to your local computer and you save, edit and distribute the document as you normally would.
The MyPleadings child support calculator is completely online and really easy to use! You start by selecting who will have custody (including joint custody), then enter incomes, tax filing information and deduction information. MyPleadings automatically calculates the parties’ net incomes and shows you the Transfer Payment. The Transfer Payment automatically updates each time you make a change and you immediately see how the change impacts the Transfer Payment without having to switch screens, re-run the calculation, etc.
You can manually enter tax information if you wish to do so. This is done by unchecking “Estimate Taxes”. We recommend manually entering tax information in more unusual or complicated tax situations.
Maintenance is non-deductible and non-taxable by default. However, you can make maintenance deductible and taxable if you want to; this may be useful in modification situations. You can also set whether imputed income is taxable or non-taxable. You can also assign the applicable “Approximate Median Net Monthly Income” figures with one click.
Once you are satisfied with your calculation, you download your Child Support Worksheet as an editable Word document. MyPleadings also prepares an optional Summary page which ‘shows the math’ of the Transfer Payment and any applicable deviations.
You can save different versions of your child support calculation. Once you have your final calculation, you select ‘Use this variation in the Child Support Order’ and the relevant data will automatically populate in your CSO.
You can learn more about the MyPleadings Washington Child Support Calculator here.
MyPleadings has joint custody, split custody (Arvey calculation), whole family and residential credit adjustments. You can make manual adjustments to the child support amount after computing the basic support calculation. Additionally, MyPleadings can extrapolate income for combined net incomes over $12,000 and can also compute child support for cases with more than 5 children.
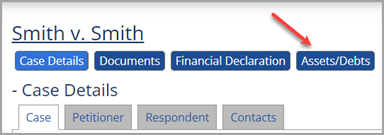
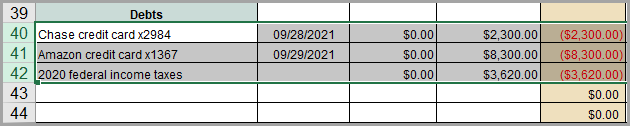
You access the Assets/Debts page by selecting your case and clicking the Assets/Debts button:
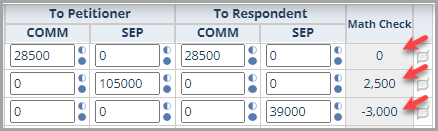
Here is what the Assets/Debts data entry webpage looks like:
Here are a few things to know about the data entry:
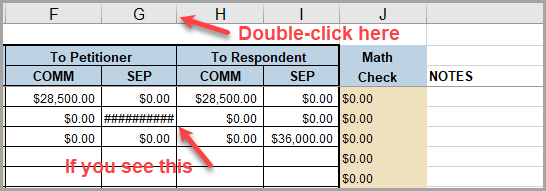
Once you have done your data entry, click Save Worksheet and then Download Excel Worksheet to download your Asset/Debt spreadsheet.
Here are few things to know about the Excel spreadsheet:
As you’ve probably noticed, the Financial Declaration has two separate data entry sections: The Financial Declaration (131) document and the Financial Declaration – Income/Deduction Info (we call this the FD calculator). There are a few reasons why we separate this into two screens, one of which is so that you can limit the Document Sharing to just expenses, just income/deductions, or both.
The Financial Declaration (131) document is where you actually draft the Financial Declaration. This portion of the data entry contains questions relating to education, employment and expenses/debts. You can access this from your Document Dashboard or directly from the FD calculator.
The more technical data entry for the FD takes place in the Financial Declaration - Income/Deduction Info. This FD calculator includes all of the income and deduction information, including taxes. You can access this in the navigation bar for your case or directly from the Financial Declaration (131) document.
You'll notice that clients don't have the ability to fill out the Child Support Calculator, just the Financial Declaration Calculator. However, once the FD Calculator is filled out, you can import the data directly to the CS Calculator (and vice versa). You'll see an Import button on one of the calculators if the other calculator has been filled out. It looks like this:
The asterisk tells you that you are importing data from the version that you have selected to be your final Child Support of Financial Declaration calculation.
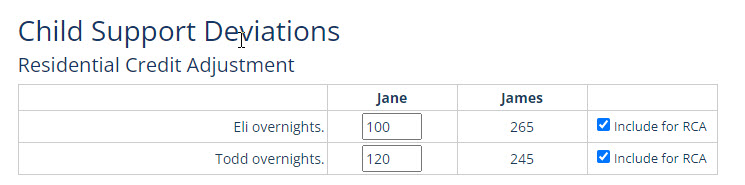
The Residential Credit deviation is a reduction in the obligor’s child support obligation based on having a certain minimum number of overnights with one or more of the parties’ children. MyPleadings has two different methods for calculating the Residential Credit deviation. You can learn more about the differences between the methods here.
You can apply the Residential Credit deviation as follows:
1. Go to the Deviations tab in the Child Support section.
2. Add the number of overnights for the non-custodial parent and check the “Include” box for each child you want to include in the deviation.
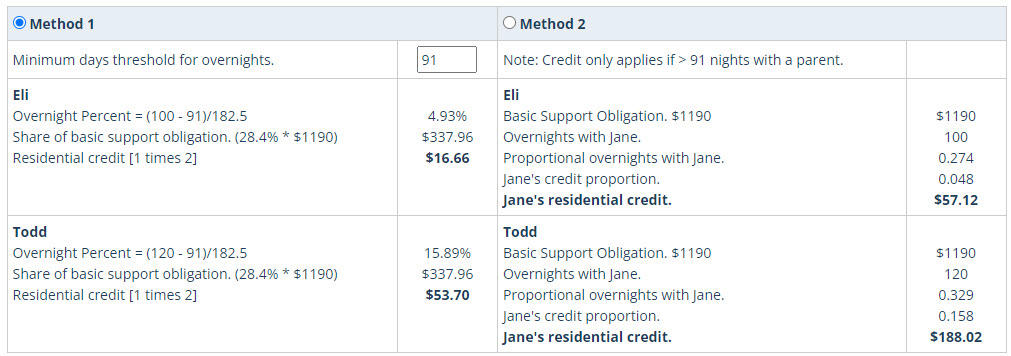
3. Next, select which of the two methods you want to apply. Method 1 requires that you set a threshold over which you want the credit to apply. This can be any number between 0-182. You can think of it this way: What is the minimum number of overnights over which you think a parent should receive some amount of credit? Method 2 is based solely on having more than 91 overnights with a child and does not require you to set a threshold. You are able to see the difference between the two methods side-by-side.
The deviation will appear on the Summary page as well as in your Child Support Order.
A Residential Credit is a reduction in child support on account of a meaningful amount of time spent with the children. There is not a required formula for the Residential Credit, although one version of the credit is most commonly used. MyPleadings offers two different Residential Credits.
Method 1. This version of the credit has two features worth noting. First, you can select the ‘threshold’ over which you want a parent to receive credit. The default is 91 overnights, but you can change this to any number you want. You can think of the threshold as the minimum amount of time that is appropriate to result in a reduction of child support. That could be 25%, but you could agree (or argue) that it should be higher or lower than this amount.
The second feature is that this credit multiplies the ‘credit proportion’ by a parent’s percentage share of the Basic Support Obligation rather than just using the Basic Support Obligation. By applying the credit to the parent’s share of the Basic Support Obligation, the obligor parent will (usually) always have at least some child support obligation, even if its minimal. Method 2 can easily result in a parent having no child support obligation if the credit exceeds that parent’s share of the Basic Support Obligation.
Method 2. This is the most commonly used Residential Credit. It originates from the 1990 Washington State Child Support Schedule but was removed in subsequent versions of the Schedule. This version of the credit provides credit if a child is with a parent more than 91 overnights per year. A parent’s credit is based on the Basic Support Obligation per child rather than a parent’s percentage share of the Basic Support Obligation. The net effect of this framework (arguably) is that the credit is overweighted relative to that parent’s obligation.
There is not a ‘right’ answer and you should decide which credit to use based on the facts and circumstances of your case.
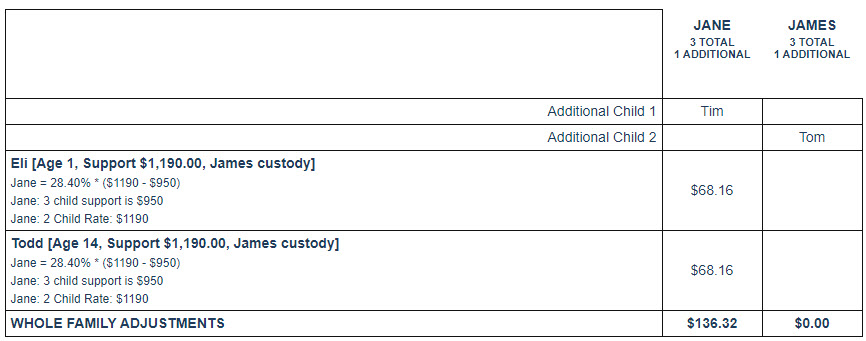
The Whole Family deviation is a reduction in the obligor’s child support obligation based on them paying a child support obligation for other non-joint children.
The whole family, per child adjustment is calculated as follows: Determine the standard support obligation for the number of children from the current relationship. Determine the standard support obligation for the total number of children for whom the support obligor has a support obligation as if all children were part of the current family. Subtract the standard support obligation for all children from the standard support obligation for the children of the current relationship. Multiply that amount by the parent's percent of net income. That amount is the whole family adjustment (credit) that the obligor will receive per child from the current child support obligation.
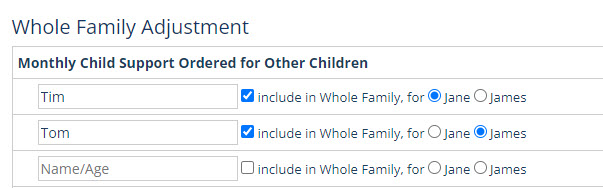
You can apply the Whole Family deviation as follows:
1. Go to the Deviations tab in the Child Support section.
2. Scroll down to the Whole Family Adjustment section. Add the non-joint child’s name, check the “Include” checkbox, and select whose child it is. You can add children for both parties; MyPleadings will only include the children of the obligor.
The deviation will appear on the Summary page as well as in your Child Support Order. Note that it does not appear in the Child Support Worksheet since the worksheet just addresses the standard calculation.
Here's an example of the Whole Family deviation and the resulting credit:
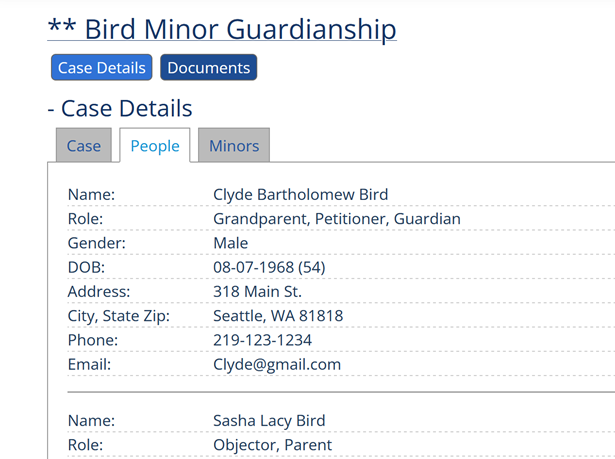
Minor Guardianship cases use a different structure for Case Data than you'll find in other types of MyPleadings cases. Instead of using separate tabs for Petitioner and Respondent there is a "People" tab and a "Minors" tab:
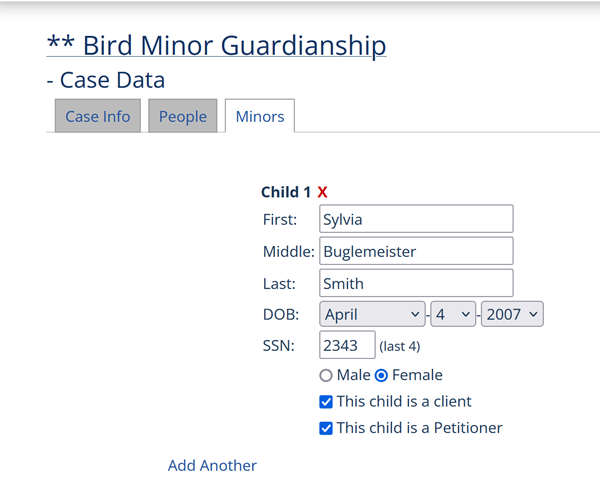
Because these types of cases can potentially have many different actual parties and notice parties, you can add an unlimited number of parties in the "People" tab. Since people can potentially take on multiple overlapping roles (for example Grandparent, Petitioner, Guardian) we allow you to add as many different Roles to each person as you want. Additionally, you can enter attorneys, GALs, and all the other type of people who can be involved in a MG case. The minor children involved in a Minor Guardianship will still be entered in the "Minors" tab. However since a minor child can potentially be a Petitioner and/or a Client on a case, we've added checkboxes that let you assign these roles to a child:
How all of these people interact with the Minor Guardian documents varies greatly depending on the document! MyPleadings will automate these relationships in the documents where it makes sense to do so, while still leaving you with discretion to make important decisions and alterations where needed. Please note that you will have to use your judgment on which documents are appropriate for your client types! If you have a mismatch between your client and the type of document you run, you will get bad results. For example, if your client is not an "Objector" and you run the Objection to Minor Guardianship (GDN M 301) document, there will be some issues with the resulting document. You will need to take care to make sure that your clients have the appropriate roles set up for the type of documents you are generating!
Note: Client Data Entry does not work for the Minor Guardianship casetype, so you will not see this option for these cases. |